Intro to Autodesk Maya's Interface for Animation
- amandamkozub
- Sep 4, 2023
- 3 min read
Updated: Sep 5, 2023
Brief overview of Autodesk Maya's animation interface.

1. Menu Sets

A drop-down menu where you can set the menus that will display along the top of the screen. The options are: Modeling, Rigging, Animation, FX, Render and Customize. Naturally when we're animating, so we set this to Animation.
2. Menus

These are the animation menus that appear when you set the Menu Set to animation. We will go over these in detail in another post.
3. Tool Set
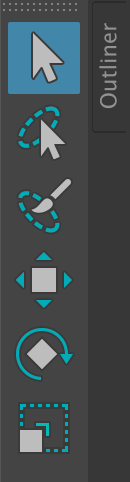
The tools for interacting with objects in Maya's viewport.
Select Tool (tool used to select objects/components)
Lasso Tool (tool used to select objects/components)
Move Tool (tool used to translate objects/components)
Rotate Tool (tool used to rotate objects/components)
Scale Tool (tool to scale objects/components)
4. Quick Layout Buttons

Single Panel Layout for the Viewport.
Four Panel Layout for the Viewport.
Two Panel Layout for the Viewport.
Open the Outliner.
Search for tools and commands
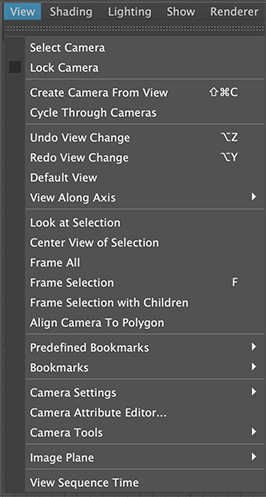
5. Viewport Menu

The additional menus and buttons for the viewport.
View- provides access to a variety of camera options and controls.
Shading- display options for shaders and geometry in the viewport.
Lighting- controlling the lights in the viewport.
Show- you can set what items/objects can appear visible in the viewport.
Renderer- set and control the renderer for rendering out images from Maya.
Panels- can and set the Panels options for the viewport.
 |  |  |
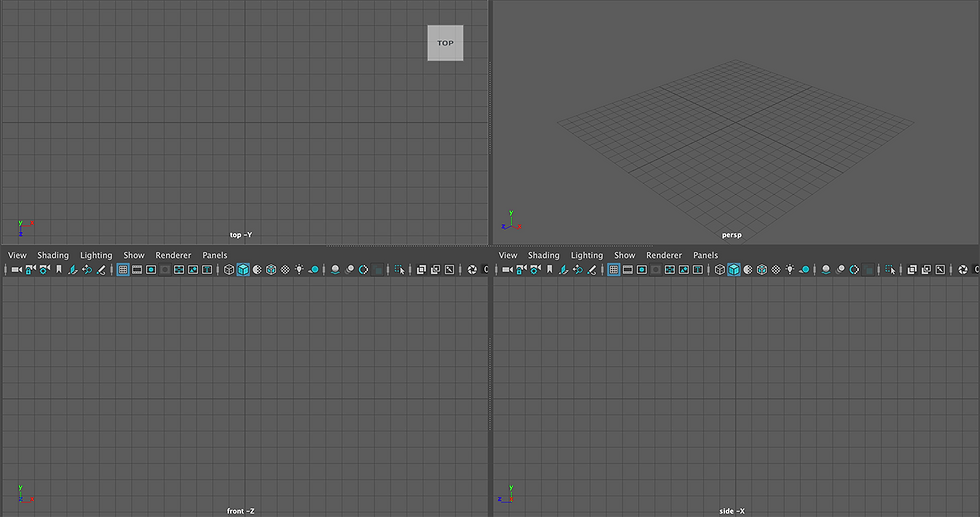
6. Viewport

Where you can interact with models and rigs, organize and arrange a scene. The default viewport is perspective (persp) and you can work with and view an object in 3D dimensions (know as X, Y and Z).
You can use the viewport cube to quickly view an object from a particular angle.
If you hold your cursor over the viewport and tap the spacebar it will open a four panel layout (which will include persp, Orthographic Side, Orthographic Front and Orthographic Top). Orthographic Views are flat 2 dimensional views of the scene. Orthographic views are very helpful when you are modeling and rigging.
7. Channel Box
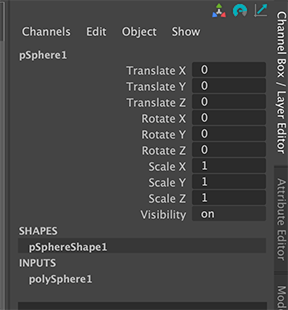
The channel box show what transformations can be done to an object you have selected (Translate, rotate, or scale).
In the channel box you can control what channels animation keys can be set on. You can set a key on all available channels or only the ones you select. You can also break/remove keys.
Channels that have keys on them will be red.

When you right-click on any channel, a menu will appear- you have the options to key selected (set a key on a selected channel(s)), key all keyable, or break connections (delete a key). You can also lock or unlock a channel.

8. Display Layers
 |  |
Click the plus sign button to create a display layer. You can add any models or rigs to a display layer. Select a model or models in the viewport, right click on the display layer and select add selected objects.
To lock the objects on a display layer so they cannot be selected, click twice on the third box next to the layer name to set it to R (reference).
To turn items on a display layer invisible click on the V.
9. Timeslider

Where you can set, add, delete, copy or move keys. Keys will appear as red lines, you must have an object selected in order for the keys to appear.
A- You can control what frame the scene starts and ends on. You can enter the frame numbers in the boxes or use the slider.
B- Set the frame rate for the scene. Standard frame rate for feature animation is 24 frames per second (fps) and for film and games it is 30 fps.
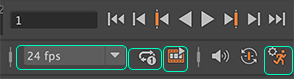
The circle with arrows you can click on to set the cycling of the timeslider (infinite, single, or oscillating).
The button with the film strip and triangle is for making a playblast (exporting a video from the viewport).
The speaker is to adjust the volume of any imported audio.
The button that looks like a face turns autokey on and off (autokey will automatically set keys for any changes you make to items that have had a key placed on them once already).
The button with a person on it is a shortcut to adjust your animation preferences.


Comments